Hartshill Hayes Promotional Video from Willow Collins on Vimeo.
Editing.
We had some trouble originally with the software and the files because we lost some of our clips when transferring the files from SD card to the Mac computer but we had backups so that it was easy to get the clips back. We did waste a whole day trying to put files imported to premier pro, because we originally was just working from a hard drive, we then had to put the files onto the computer then to premier pro because working of the hard drive slowed things down. When going back through the footage and sound, mainly with the interview with he ranger, because the mic was constantly being moved we had a lot of unwanted sound that we couldn't fully edit out. Because we didn't use a tripod in a lot of the shots we had to use the warp stabiliser which in some shots didn't fully work, so we had to be brutal with some of the shots so that only the best possible shots were left. When editing the interviews we found that we had to cut out a lot of fillers, when people spoke there were lots of "errs" and "umm" so we had to do a lot of chopping in order to have what they are saying flow. We didn't realise how long the interviews were going to be, so first we edited and hoped to what was usable and we felt like we needed to include. We then later had to cut more of the interviews out to keep the video shorter. If we did this again, i would make sure to label and organise the clips before we start editing because when we were editing, one of the hardest things was going through the clips to find which one to use, we should have labelled and sorted out to get a general idea of what clips we could use when to add more structure to the process and possibly save us more time. We also found when editing that we had to colour correct a lot with he clips because on one of the cameras the white balance was off this also slowed us down because we had to make sure that the clips matched with he exposure and colours. What we did well was cutting all the unimportant clips that, although was nice didn't add anything to the narrative and would have made the video longer than it should be and the music that Willow wrote went really well with the video, as it set the right mood for the video with was calming and relaxing. During the edit we also checked that we had everything that the client asked for, like logs, fonts and that we mentioned certain parts of the Hays. We had a lot of technical difficulties, during the several days of editing we lots some clips and so there are parts in video where we had clips over the interviews, which no longer exist, so we submitted a second draft to meet our deadline, we are able to re-shoot and salvage footage for a final draft when our client comes back from holiday in 2 weeks.
We made the interviews the main component in our video, this is to show that Hartshill Hays is a place for people and to get different insights of the different age groups around the hays to give a more realistic insight. We also had people walking around or playing in the park as apposed to just showing the empty spaces because it makes it more realistic and better to show the parks main spots being used, so it looks better than just empty spaces when people are talking about them. We had a lot of footage, so in order to shorten the film to a watchable length, we had to cut out a lot of it, which include cutting the umms from the interviews as they added more time and made the interviews more boring so we edited them out. We adjusted a lot of the colours so that all the footages white balanced match to make it look more professional and so that no shot stood out because it was a different colour that didn't go with the rest of the video. We each had our own ideas for this video, in order for the ideas to be shared and listen to we assigned jobs roles in which we could express our own ideas within the set job role, mine was filming (this allowed me to take shots that i felt would work within the video, it helped in the previous years at college that i took photography so i was well experienced with the camera and experimenting with different angles), Conner was directing and communication and Willows was Music. We all assisted with the editing as it was a big job, too big for anyone to do alone, so we worked as a team when editing taking it in turns and listening to each ideas and trying them out to see what would work and what didn't.
Showing posts with label Unit 30 - camera and lighting techniques. Show all posts
Showing posts with label Unit 30 - camera and lighting techniques. Show all posts
Friday, 5 May 2017
Friday, 2 December 2016
health and safety
When filming in the studio we would make sure the wires were out of the way as possible to avoid anyone tripping over and we also made sure that there was plenty of room so that none of the equipment was knocked over or tripped over when moving around the studio. We also made sure to turn off the lights that were not being used and to not face the bright lights in anyones eyes. The lights can get quite hot, so before we moved them around we made sure they were cool enough for no one to get burned.
Low key lighting, his key lighting and reflectors
Thursday, 24 November 2016
Edge lighting


Edge lighting is when only one side of the face is in light and the other side has a shadow cast upon it. It's one of the easiest lighting set ups as the main light only needs to be on one side of the subject while the camera if facing it.


Thursday, 10 November 2016
lighting Butterfly, edge and rembrandt
Sequence 01 from abbie on Vimeo.

 Using three different light sources, the key light which is placed 45 degrees to the side of the subject, the fill light which is opposite the camera often a reflector is used, and a back lighting. This lighting can be identified but the triangle shaped light under the eye, as shown in the second image.


Edge lighting


Butterfly lighting is lighting that creates a shadow below the subjects nose that resembles a butterfly. This lighting is from a single light source placed higher than the subject but not directly above them. This lighting is often used to create softer lighting to make mostly females prettier.


Edge lighting
Edge lighting is when only one side of the face is in light and the other side has a shadow cast upon it. It's one of the easiest lighting set ups as the main light only needs to be on one side of the subject while the camera if facing it.
Butterfly lighting


Butterfly lighting is lighting that creates a shadow below the subjects nose that resembles a butterfly. This lighting is from a single light source placed higher than the subject but not directly above them. This lighting is often used to create softer lighting to make mostly females prettier.


Thursday, 3 November 2016
Editing types and shots video
This is my video, showing different editing types and shots, there is the establishing shot at the beginning, followed by shot, reverse shot, the 30 degree rule, the 180 degree rule, cross cutting, match in action and the Kuleshov Effect.
The scenes i shot for this were under exposed, as i shot inside. The video may also be a bit confusing because i used the same location and people for all shots and editing types, someone could easily get mixed up to witch shot is which. Also going into this i was not that sure of some of the shots and editing types and so i tried to keep them basic, so that mainly I could understand the shots. The explanations in the video are not as clear as they could be, but i only have a basic understanding of these shots and so i couldn't go into much detail. However i managed to give examples of all the shots and editing types with simple examples and explanation. The footage is edited together with jump cuts and with no tampering to the footage colour.
The scenes i shot for this were under exposed, as i shot inside. The video may also be a bit confusing because i used the same location and people for all shots and editing types, someone could easily get mixed up to witch shot is which. Also going into this i was not that sure of some of the shots and editing types and so i tried to keep them basic, so that mainly I could understand the shots. The explanations in the video are not as clear as they could be, but i only have a basic understanding of these shots and so i couldn't go into much detail. However i managed to give examples of all the shots and editing types with simple examples and explanation. The footage is edited together with jump cuts and with no tampering to the footage colour.
Monday, 17 October 2016
Camera shots
camera shots from abbie on Vimeo.
This video shows the different camera shots. I have labeled each shot to make it easier to tell which shot is which. I have tried to keep the shots clear as to what they are. The tracking shot is not done well as i put the camera in a trolly and you can see the bars of the trolly taking up most of the shot, i changed the aperture so the bars are out of focus,s o you can tell who i am tracking and the trolly gave the movement more ease however there is a part where the trolly goes over a bump and you can tell because the camera jumps a little. I tried to keep all my shots clear and of a good quality and i think i did this well because I had a lot of natural lighting so i could have the ISO low in a lot of the shots. However I used the same person in most of my shots and because i made it simple, so i when editing and the person watching could easily see and tell which shot is which even without the titles, the video is a bit boring, i could have taken a range of different objects and people to get the shots and their would have been more of a variety. I think i have managed to capture the shots well as for example in the extreme close up, you can see what is meant to be in the image which is a feature of the persons face, but i also had a low aperture so that the background is out of focus which draws more attention to the factual feature in focus. I tried to order the shots well, as at the beginning of the video you see a close up followed after by an extreme close up where you can see a comparison from close up to extreme close up, followed by mid shot, long shot and establishing shot. Most of the time the establishing shot would be at the beginning for example in a film it would normally start with an establishing shot or extreme long shot so the audience knows where the film is set, however i put my establishing shot int he middle of the video because i preferred to group the mid shots, close ups and long shots together so it is easier to compare them.
This video shows the different camera shots. I have labeled each shot to make it easier to tell which shot is which. I have tried to keep the shots clear as to what they are. The tracking shot is not done well as i put the camera in a trolly and you can see the bars of the trolly taking up most of the shot, i changed the aperture so the bars are out of focus,s o you can tell who i am tracking and the trolly gave the movement more ease however there is a part where the trolly goes over a bump and you can tell because the camera jumps a little. I tried to keep all my shots clear and of a good quality and i think i did this well because I had a lot of natural lighting so i could have the ISO low in a lot of the shots. However I used the same person in most of my shots and because i made it simple, so i when editing and the person watching could easily see and tell which shot is which even without the titles, the video is a bit boring, i could have taken a range of different objects and people to get the shots and their would have been more of a variety. I think i have managed to capture the shots well as for example in the extreme close up, you can see what is meant to be in the image which is a feature of the persons face, but i also had a low aperture so that the background is out of focus which draws more attention to the factual feature in focus. I tried to order the shots well, as at the beginning of the video you see a close up followed after by an extreme close up where you can see a comparison from close up to extreme close up, followed by mid shot, long shot and establishing shot. Most of the time the establishing shot would be at the beginning for example in a film it would normally start with an establishing shot or extreme long shot so the audience knows where the film is set, however i put my establishing shot int he middle of the video because i preferred to group the mid shots, close ups and long shots together so it is easier to compare them.
Friday, 23 September 2016
Apature
apature from abbie on Vimeo.
The aperture changes the focus of a shot. The larger the aperture e.g F/2 the more light allowed into the image but the more shallow the focus. Shallow focus or a shallow depth of field is when there isn't a lot in focus, meaning if you have a object in focus the background and surrounding area will be out of focus. When the aperture is small e.g F/22 it has a deep depth of field meaning everything or at least a lot of the image is in focus. When the aperture is low it also lets in less light. For the video i used a tripod as i used a telephoto lens, which is heavier and picks ups shakes more. So in order not to have shakes i used a tripod, however some of the panning was a bit jumpy, so i used a warp stabiliser in editing, so the video looks better and smoother.
The screenshot below is of an aperture of F/5, this is a low aperture that has brought in plenty of light so the image is slightly over-exposed. You can see the shallow focus, as there is only one section in focus, the leaf at the front and the bushes towards the back are all out of focus. A shallow focus is used to draw attention to one particular thing in the shot, when used this would show that the particular thing in focus is important to the narrative.

 The screenshot to the left has an aperture of F/8 this is a slightly deeper depth of field you can see compared to the F/5 screenshot there is more in focus however there is still party of the leaves out of focus. This aperture is good for shots where there are a couple of characters in shot and the camera needs to focus not them but instead of all the focus being on the characters , there is a little background to give it context, it could also be used to have someone walking into focus.

 The screenshot to the left has an aperture of F/22. This is deep depth of field meaning everything is in focus. This is a good example of deep depth of field because of how much is in focus and the shot is correctly exposed. This aperture is best for establishing shots because all the background and everything is in focus.
The image to the right is of my first try shooting. As you can see the shot is over exposed due to the low aperture opening up the lens and allowing more light into the camera and while filming i didn't use a tripod and so the footage came out very shaky. Although it did show the shallow focus well,as the leaves in front are in focus and the background is completely out of focus.
If i re-shot, i would pan slower on a tripod to stop the shakes. so i don't have to rely on the editing so much. I would also change the shutter speed, in order for the scenes to be correctly exposed so that the shots are more effective and we could focus on the aperture.
The aperture changes the focus of a shot. The larger the aperture e.g F/2 the more light allowed into the image but the more shallow the focus. Shallow focus or a shallow depth of field is when there isn't a lot in focus, meaning if you have a object in focus the background and surrounding area will be out of focus. When the aperture is small e.g F/22 it has a deep depth of field meaning everything or at least a lot of the image is in focus. When the aperture is low it also lets in less light. For the video i used a tripod as i used a telephoto lens, which is heavier and picks ups shakes more. So in order not to have shakes i used a tripod, however some of the panning was a bit jumpy, so i used a warp stabiliser in editing, so the video looks better and smoother.

The screenshot below is of an aperture of F/5, this is a low aperture that has brought in plenty of light so the image is slightly over-exposed. You can see the shallow focus, as there is only one section in focus, the leaf at the front and the bushes towards the back are all out of focus. A shallow focus is used to draw attention to one particular thing in the shot, when used this would show that the particular thing in focus is important to the narrative.

 The screenshot to the left has an aperture of F/8 this is a slightly deeper depth of field you can see compared to the F/5 screenshot there is more in focus however there is still party of the leaves out of focus. This aperture is good for shots where there are a couple of characters in shot and the camera needs to focus not them but instead of all the focus being on the characters , there is a little background to give it context, it could also be used to have someone walking into focus.
 The screenshot to the left has an aperture of F/22. This is deep depth of field meaning everything is in focus. This is a good example of deep depth of field because of how much is in focus and the shot is correctly exposed. This aperture is best for establishing shots because all the background and everything is in focus.
The image to the right is of my first try shooting. As you can see the shot is over exposed due to the low aperture opening up the lens and allowing more light into the camera and while filming i didn't use a tripod and so the footage came out very shaky. Although it did show the shallow focus well,as the leaves in front are in focus and the background is completely out of focus.
If i re-shot, i would pan slower on a tripod to stop the shakes. so i don't have to rely on the editing so much. I would also change the shutter speed, in order for the scenes to be correctly exposed so that the shots are more effective and we could focus on the aperture.
Thursday, 22 September 2016
Shutter speed
Sequence 01 from abbie on Vimeo.
The shutter speed, control the exposure of camera, the longer the shutter speed e.g 1/30, the more light is allowed in the camera, the shorter the shutter speed time, the less light there is, as there is less time for the light to get into the camera. When the shutter speed is low, the more light can enter the image however without a tripod the image can have movement blurs, as when the shutter speed is low it pick up more movement and too much movement can lead to blurs in the image or video.
This is not the best example of shutter speed, as some of the shots of over exposed like 1/30 of a second. The videos are also out of focus, because i couldn't directly see the camera when shooting the videos came out unfocused. It would be best to re-shoot the videos to get a clearer example of the different shutter speeds in use. The faster shutter speed would best for action sequences with fast movement as the moves would be seen as more precise without movement blurs. Slower camera speeds can be used for scene where there isn't a lot of lighting and the characters aren't moving too much, as the little movements won't create movement blurs and the lower shutter speed will let enough lightning for the shot to be correctly exposed.
This screenshot is 1/30 of a second.The image has more movement blur because of the slower shutter speed. The image is also a lot brighter than the others because more light can get into the image because of more light getting into the image.

 The image to the right is a screenshot of my video at 1/50 of a second. The is the average shutter speed when filming. As you can see there is less movement blur compared to the 1/30 of a second but there is still slight movement blurs.
 This screenshot is of 1/250 of a second, there is a lot less movement blur than the other two shutter speeds, because it is quicker at capturing the the image per frame. However this image is darker as the shutter speed doesn't allow as much light.
The shutter speed, control the exposure of camera, the longer the shutter speed e.g 1/30, the more light is allowed in the camera, the shorter the shutter speed time, the less light there is, as there is less time for the light to get into the camera. When the shutter speed is low, the more light can enter the image however without a tripod the image can have movement blurs, as when the shutter speed is low it pick up more movement and too much movement can lead to blurs in the image or video.
This is not the best example of shutter speed, as some of the shots of over exposed like 1/30 of a second. The videos are also out of focus, because i couldn't directly see the camera when shooting the videos came out unfocused. It would be best to re-shoot the videos to get a clearer example of the different shutter speeds in use. The faster shutter speed would best for action sequences with fast movement as the moves would be seen as more precise without movement blurs. Slower camera speeds can be used for scene where there isn't a lot of lighting and the characters aren't moving too much, as the little movements won't create movement blurs and the lower shutter speed will let enough lightning for the shot to be correctly exposed.
This screenshot is 1/30 of a second.The image has more movement blur because of the slower shutter speed. The image is also a lot brighter than the others because more light can get into the image because of more light getting into the image.


 This screenshot is of 1/250 of a second, there is a lot less movement blur than the other two shutter speeds, because it is quicker at capturing the the image per frame. However this image is darker as the shutter speed doesn't allow as much light.
Tuesday, 20 September 2016
ISO comparison
The ISO can help you adjust the lighting on a image. If you take a picture and the image is under-exposed you can change the ISO, the higher the Iso the more light you can get in your image. However if the ISO is too high the quality of the image gets changed and you can get grain and or noise on your image. Thats why you should try and keep your ISO as low as possible, around 100 or 200. When taking an image that is under lit, you should change the shutter speed or the aperture first, as then it allows you to keep the quality of the image.

The screen show bellow is when i used an ISO of 200, the quality is better as their is less grain as outside it was brighter and the ISO could be kept low.

I showed the ISO changes in two videos played one after the other, with the 200 first then the 3200. I also added text in the video so the person watching the video can easily tell which ISO was used for which video. However i could have shown the videos in a more effective way by having the two videos played side by side, in red to show a direct comparison. Also in my first clip, the 200 ISO, the quality of the video isn't very good as it is slightly out of focus and the panning is shaky. I attempted to fix the handheld shake from the camera by using a warp stabiliser, but the effects are minimal when compared to the original clip.
The technical challenges that i faced during the shoot is the steadiness of the camera, i could have used a tripod to demonstrated a steady pan. I would have also preferred to show the lowest ISO which is 100, however the lighting outside wasn't great,s o the best i could film is 200. Although i managed to change the ISO with no problem and if i came to it and i did need to change the aperture or the shutter speed, i would know how to do so.
Friday, 16 September 2016
Pull focus video evaluation
pull focus from abbie on Vimeo.
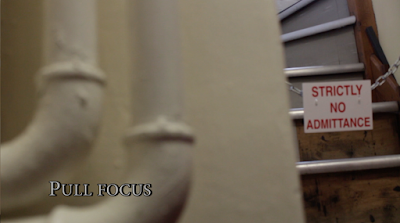
This is a screenshot of a shot from my video, everything is shot is at least slightly out of focus after the focus shift from the pipes to the sign on the stares. I didn't notice this during editing, as the unfocused shot is seen after the pull focus which means i could have cut the shot short and the unfocused shot wouldn't have been there but i didn't notice it in post production, so in the future when i am editing, i need to focus more when editing, so i don't keep having unfocused or under/ over exposed shots.

I used the effect warp stabilizer, in order to steady the scenes. As i used only hand held camera shots, which means there is slight shakey or jolts int he middle of a shot which makes it look less smooth. So the warp stabilizer helps steady the shots to make them look smoother and more natural. However there is still some light shakes throughout the video.
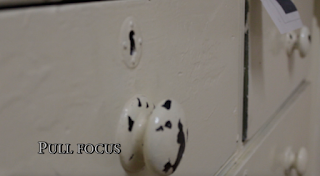
I like this shot because it runs smooth, the shift in focus is a smooth transition and the way the camera moves is not shake it runs smooth and clear. This is one of my better shots int he video because of the way it moves and it clearly shows the shift in focus which was the task. However their are still slight blurs in the shot where everything is slightly out of focus, this was noticed but i kept it because it was better than cutting a part out of the middle of the shot because the camera glides from one door nob to the other and so missing a bit out would make the shot jump slightly, so i kept the unfocused part in.


I added text to my video, and i also added the cross dissolve for the text to enter and exit on. I wanted to experiment with the effects and filters and by having the the text dissolve, it goes with the change of focus on screen. I also edited the colour of my text to try and been with the background, so it doesn't distract the viewer from what i gave filmed. The trouble with getting the text is to go with he background is that the background changes and so in some shots the text does stand out more than on other shots.
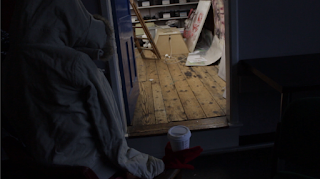
The last shot on my video doesn't clearly show the pull of focus. I tried to have the focus on the door then the mannequin, however because most of the shot is underexposed it is not clearly seen. However what I do like about this shot is nearing the end a shadow comes over the mannequin and so at the end of the video it looks like a natural closing shot to a video. I would re-shoot this and get maybe a better, lower angle alongside a clearer demonstration of the pull focus. Although the video is good quality and not out of focus but still there is slight camera movements that can easily be detected.

This is a screenshot of a shot from my video, everything is shot is at least slightly out of focus after the focus shift from the pipes to the sign on the stares. I didn't notice this during editing, as the unfocused shot is seen after the pull focus which means i could have cut the shot short and the unfocused shot wouldn't have been there but i didn't notice it in post production, so in the future when i am editing, i need to focus more when editing, so i don't keep having unfocused or under/ over exposed shots.

I used the effect warp stabilizer, in order to steady the scenes. As i used only hand held camera shots, which means there is slight shakey or jolts int he middle of a shot which makes it look less smooth. So the warp stabilizer helps steady the shots to make them look smoother and more natural. However there is still some light shakes throughout the video.

I like this shot because it runs smooth, the shift in focus is a smooth transition and the way the camera moves is not shake it runs smooth and clear. This is one of my better shots int he video because of the way it moves and it clearly shows the shift in focus which was the task. However their are still slight blurs in the shot where everything is slightly out of focus, this was noticed but i kept it because it was better than cutting a part out of the middle of the shot because the camera glides from one door nob to the other and so missing a bit out would make the shot jump slightly, so i kept the unfocused part in.


I added text to my video, and i also added the cross dissolve for the text to enter and exit on. I wanted to experiment with the effects and filters and by having the the text dissolve, it goes with the change of focus on screen. I also edited the colour of my text to try and been with the background, so it doesn't distract the viewer from what i gave filmed. The trouble with getting the text is to go with he background is that the background changes and so in some shots the text does stand out more than on other shots.
The last shot on my video doesn't clearly show the pull of focus. I tried to have the focus on the door then the mannequin, however because most of the shot is underexposed it is not clearly seen. However what I do like about this shot is nearing the end a shadow comes over the mannequin and so at the end of the video it looks like a natural closing shot to a video. I would re-shoot this and get maybe a better, lower angle alongside a clearer demonstration of the pull focus. Although the video is good quality and not out of focus but still there is slight camera movements that can easily be detected.

Tuesday, 13 September 2016
research development of editing technology
In 1885, the cinematographe was invented by the Lumiere Brothers, this was a device that recorded, captured and projected moving images. Shortly after the Lumiere Brothers invented the cinematographe, Edwin. s. porter showed that a film didn't need to be one long take, and instead created a story that was different to the original footage story.
The film "for love of God" by D.W Griffiths was the first film with a continuity cut when a scene cut, he then developed a way to show emotion int he film, instead of just the actors shwoing. What he did was use different camera angles and changing the speed of the editing. He later went on to make "the birth of a nation" which included many camera techniques filmmaker use today like panoramic long shots, still shots, cross cutting, iris effect and panning shots.
Lev Kuleshov discovered the Kuleshov effect, which was a montage effect. The potentials of montage were explored by Eisenstein and Dziga Vertov as Eisenstein's in 1925 thought he could by using a montage in film, could explore different ideas in his film Battleship Potemkin- montage.
Before computer editing, there was analog editing. The negative of the film would be cut down and then pasted back into order, it was then put though a Moviola or K.E.M machine.
 Editing on a computer is much easier and faster, because it is you can cut, paste and put togetehr all on one machine as analog you would need to cut the negatives. Many editing software's are available such as Imovie or Adobe Premier pro. When editing on these software you can also add different visual and sound effects.
Offline editing is when the raw footage gets copied and edited in post production without effecting the cameras original footage. The name offline editing is referred to when he footage is not being edited by any other device unlike online editing, which comes after the offline editing. Offline editing has been used since near the beginning of editing, however this process was usually used to assemble scenes together than final editing, as if done wrong or imperfectly, physically cutting the image could lead to the picture breaking up.
Online editing is the final editing process, which takes place after offline editing. Online editing has mainly now been taken over by computer editing software like Adobe, that have NLE (non linear editing systems). Online editing is more automatic than offline as it is under the control of another device.


The film "for love of God" by D.W Griffiths was the first film with a continuity cut when a scene cut, he then developed a way to show emotion int he film, instead of just the actors shwoing. What he did was use different camera angles and changing the speed of the editing. He later went on to make "the birth of a nation" which included many camera techniques filmmaker use today like panoramic long shots, still shots, cross cutting, iris effect and panning shots.
Lev Kuleshov discovered the Kuleshov effect, which was a montage effect. The potentials of montage were explored by Eisenstein and Dziga Vertov as Eisenstein's in 1925 thought he could by using a montage in film, could explore different ideas in his film Battleship Potemkin- montage.
Before computer editing, there was analog editing. The negative of the film would be cut down and then pasted back into order, it was then put though a Moviola or K.E.M machine.

Offline editing is when the raw footage gets copied and edited in post production without effecting the cameras original footage. The name offline editing is referred to when he footage is not being edited by any other device unlike online editing, which comes after the offline editing. Offline editing has been used since near the beginning of editing, however this process was usually used to assemble scenes together than final editing, as if done wrong or imperfectly, physically cutting the image could lead to the picture breaking up.
Online editing is the final editing process, which takes place after offline editing. Online editing has mainly now been taken over by computer editing software like Adobe, that have NLE (non linear editing systems). Online editing is more automatic than offline as it is under the control of another device.


how and why lighting affects camera techniques for moving image
Lighting is important to film because without the proper lighting, the shots would be under-exposed or over exposed if lighting is not done properly. There are different lighting techniques like hard lighting, warm lighting, low-key lighting.

 Soft lighting creates a softer shadow on the subject or objects. There is several light sources coming from different angles. The shadow of a subject in soft lighting is faded with a gradient edge to give it the softer effect. This is often used as fill lighting to lessen the use of shadows or to make a subject look better as the lighting is not as harsh on the face.
Bibliography:Marine, J. (2013) Basic lighting lesson: Understanding hard light and soft light. Available at: http://nofilmschool.com/2013/03/basic-lighting-lesson-hard-soft-light (Accessed: 13 September 2016).In-line Citation:(Marine, 2013)
Bibliography:Theme, M. and Media, rd W. 3 (2016) KEC Moodle: Log in to the site. Available at: http://moodle.kinged6nun.ac.uk/mod/resource/view.php?id=46643 (Accessed: 13 September 2016).In-line Citation:(Theme and Media, 2016)
Bibliography:Lavideofimlmaker (2010) Film lighting techniques and tips: With pretty pictures! Available at: http://www.lavideofilmmaker.com/filmmaking/film-lighting-tips.html (Accessed: 13 September 2016).In-line Citation:(2010)
how and why lighting affects camera techniques for moving image
Lighting is important to film because without the proper lighting, the shots would be under-exposed or over exposed if lighting is not done properly. There are different lighting techniques like hard lighting, warm lighting, low-key lighting.
Soft lighting creates a softer shadow on the subject or objects. There is several light sources coming from different angles. The shadow of a subject in soft lighting is faded with a gradient edge to give it the softer effect. This is often used as fill lighting to lessen the use of shadows or to make a subject look better as the lighting is not as harsh on the face.Bibliography:Marine, J. (2013) Basic lighting lesson: Understanding hard light and soft light. Available at: http://nofilmschool.com/2013/03/basic-lighting-lesson-hard-soft-light (Accessed: 13 September 2016).In-line Citation:(Marine, 2013)
Bibliography:Theme, M. and Media, rd W. 3 (2016) KEC Moodle: Log in to the site. Available at: http://moodle.kinged6nun.ac.uk/mod/resource/view.php?id=46643 (Accessed: 13 September 2016).In-line Citation:(Theme and Media, 2016)
Bibliography:Lavideofimlmaker (2010) Film lighting techniques and tips: With pretty pictures! Available at: http://www.lavideofilmmaker.com/filmmaking/film-lighting-tips.html (Accessed: 13 September 2016).In-line Citation:(2010)
List of lighting equipment and setups that you would use for the following...
A small documentary where portability is paramount
- Audio reorder
Inhances the volume, so everything that you have filmed can be heard
It's an extra thing to carry around and setup, this could waste time and make things harder
When going through the recordings, you may find something you missed shooting
Having an extra recording device besides from a camera can make people being filmed act less natural
- shoulder mount
It's eaier to move around to capture shots
Shots might not be as smooth as when using a tripod
- tripod
Steady shots
may waste time setting up to the correct angle and height for the shot
- LED lights
Better lit shots
takes time to setup
may put people off, if documenting people
Talking head style interviews
Talking head style interviews
- Tripod
Keep the camera steady and focused on subject
having a camera placed directly in front of someone may put them off
capture everything needed without hassle of holding camera
- Reflector
Keep the lighting soft and less harsh on the subject
can be difficult to place if not know what your doing
creates a well lit head shot
A night time shoot
- Led lights
Creates lighting in order to get well lit shots
can create too much hard lighting
- Tripod
Keep the camera till for shutter speeds under 1/60 sec
can be difficult to set up to the correct hight in the dark
Monday, 27 June 2016
Subscribe to:
Comments (Atom)